DIY Toy Box – Tons of Storage!
Heidi-ho, Neighbor! (Anyone else watch old re-runs of Home Improvement and miss the 90s?).
I haven’t had time to build anything in a while to share with you guys. I’ve been helping my mom redo her kitchen, taking a little break from blogging, Isla had a health scare in April and I haven’t felt like writing anything, if i’m being honest. But I thought I’d tell you about Isla’s toy box that I built for her first birthday! This DIY Toy Box offers tons of storage, which makes cleaning her room a breeze!
She turned one in October and I really needed a practical way to store her toys and books. We were having to get creative and stuff toys all over the place to put them away.
I had been wanting to build her a toy box but I knew it would have to have a built in bookshelf as well as storage for bigger items. I have been following Ana White for years and I had seen these plans before.
Over the past couple of years, I’ve seen a photo of this particular toy box and I’ve probably pinned it several times. Since I knew this is the one I wanted to build, I sketched out the dimensions that I would need, and got to work. I made my toy box a little taller and added legs underneath because otherwise it would have covered the only air vent in her room.
Keep in mind, I didn’t follow her plans exactly. A majority of the time, I build off of photos that I find. I see a photo I like and decide what dimensions I need and this is a bit easier than following step by step instructions and having to make changes to meet my dimensions. Wood dimensions are not always uniform and after years of building furniture, this is what works best for me. I always cut wood as I go when building instead of cutting everything beforehand. This ensures that everything fits together.
*This post contains affiliate links, meaning that at no cost to you, I will earn a commission if you click through and make a purchase. I only tell my readers about products that I really love or already use.
For this build, I used the following tools & materials:
- Table saw (This a newer model of mine) but this one is a great option if you don’t have room for a big one.
- Miter saw (I use this one for most of my smaller projects and it’s a great if you’re just starting to build up your tool collection).
- Ryobi Nail Gun and brad nails (This is SOOO useful. I use it all the time.)
- Sander (Because duh)
- Tape measure (You can’t go wrong with a Stanley)
- Wood glue (This is the kind I use)
- Table Legs- optional
- Kreg Jig– Also optional but super useful.
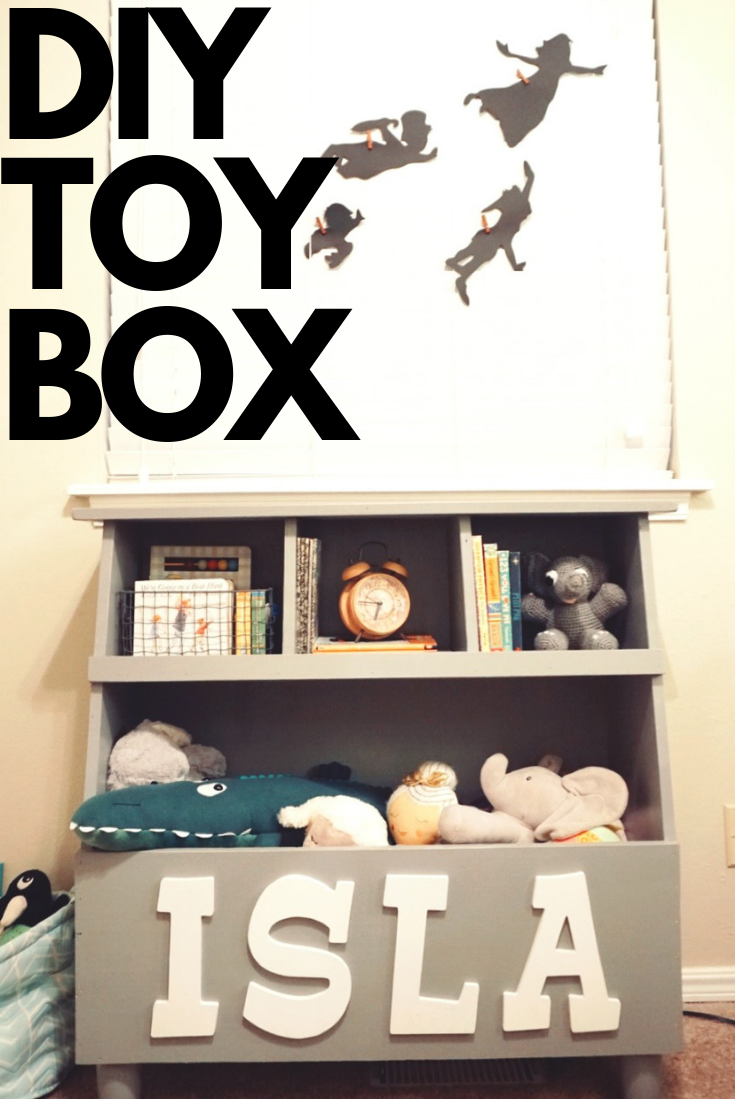
The gray paint is a custom color that I had color matched at Home Depot. It matches her crib and dresser (that my dad built for me in 1988). I got the letters on the front of the toy box from my mother in law and was waiting for the perfect project to use them. I’m not sure where she got them but you can find some similar here.
The build:
I began by cutting my side pieces. Next, I used ¾ birch plywood for almost the entire build except the trim around the top piece and the face piece of the little shelf. I used a scrap 1×2 for that. The back is some ¼ plywood that I had. If you use plywood like I did, they will cut it down for you at Home Depot or Lowes if you don’t have a way of getting it home. I did this all the time before I got my table saw.
I built the entire toy box from the extra wood that I had leftover from another project, but I expect if you build it out of plywood like I did, you could do it for about $50.
The bottom shelf and middle shelf were cut and then attached with Kreg screws. I used my Kreg jig for this part but it can also be done with just regular wood screws and glue. If you’re going to be getting into wood working, the Kreg jig is a small investment that will make building so much easier. Start with the Kreg mini if you can’t spring for the larger model. I use this thing on 95% of my builds. It makes projects look a little more polished because you can hide the pocket holes or fill them in with wood filler.
Next, I built the little book shelf dividers (by tracing the angles of the side pieces) and added the top with wood glue and my brad nailer.
I attached the front pieces on with wood glue and nails and then added the feet. I used some 6 inch little bun feet. They are very sturdy but i’ll eventually have to attach it to the wall to keep it safe since Isla is a climber.
I hid all my pocket holes so I didn’t have to fill them with wood filler but if you want you can go ahead and fill them. I did, however fill the tiny holes that my brad nailer made.
Once the filler dried, I gave the entire thing a good sanding and then wiped it down to get all the saw dust off.
It was easier to paint the entire thing without the back on. I painted the back separately and added it once everything was done. Next, I attached it through the back with 3/4 in. brad nails and wood glue.
I used 2 coats of a water based, semi gloss polyurethane and let it dry/ air out in the garage for a couple of days.
Finally, added the letters with wood glue and a few ¾ nails.

And that’s all!
She was so excited when I moved it in her room. She immediately tried to climb in the bottom part. I love it so much. All the storage! We rotate out her books from time to time with a shelf in her closet because she has so many. This shelf only holds the smaller books but you could make it larger. All it would take would be changing how wide and tall you make the side pieces.
It’s a great size and plenty big to hold some of her bigger toys in the bottom. I think it’s a great DIY project for experienced builders but don’t let it intimidate you if you’re a beginner. Just take your time and make sure to cut as you go.
Since I was in a time crunch to complete this by Isla’s birthday, I don’t have any build progress photos. (bit of procrastinator here). It was a really fast build. I had it built and ready for paint in about 2 hours.
The last thing that you’ll want to do is anchor it to the wall so that it won’t fall over. It is very bottom heavy, but better safe than sorry!

Isla’s nursery is accented with window cut-outs, treasure maps, and a stuffed crocodile to complement the vintage Peter Pan theme. I’d love to do a nursery tour soon and show you all. I love her room. It’s my favorite room in the house and usually the cleanest because all her toys now have a home.
Let me know if you guys use Ana’s plans to build this! I’d love to see pictures! If you have any questions about how I built mine, let me know! For another easy DIY build, check this out!
I hope everyone has a great rest of the week!
-P
About The Author
Payton
Related Posts

$100 Bathroom Remodel
Oh boy. This is a makeover to top all other makeovers that I’ve done…
May 19, 2020
$100 Closet Remodel
The real slim shady song has been STUCK in my head all day. I have…
April 18, 20202 COMMENTS
Leave A Comment

Marilyn Peters | 12th Jun 19
This may be your best one yet! Very detailed!
Carol Feaster | 12th Jun 19
Build her one but build bigger and a lot different. I want to see it when done. Not forget to make it safe so it can’t be pulled off bet on her.