DIY Book Page Christmas Tree Banner
DIY Book Page Christmas Tree Banner
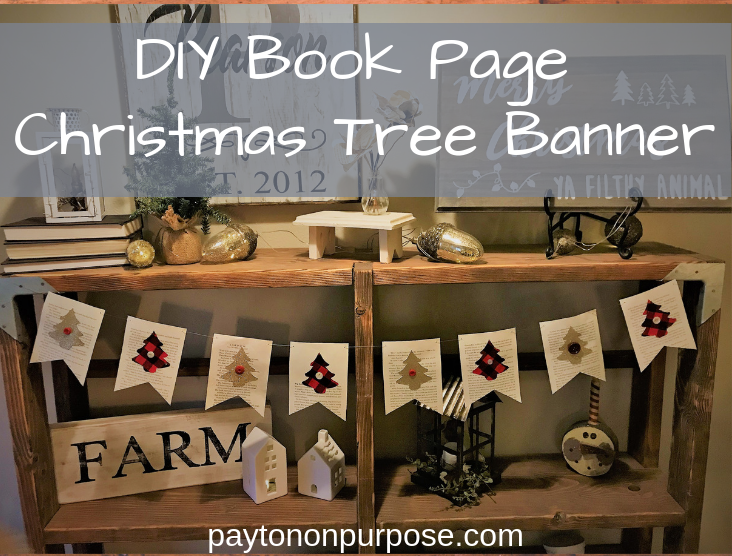
I’m excited to share with you guys how I made this adorable little Christmas tree banner! It’s currently on my entry way table but you could use it on a mantle, shelf or headboard-which I may end up doing in my guest room later on. Does anyone else move stuff all around their house trying to find a home for it? I seem to do this a lot with my Christmas decorations lately.
My sister is a librarian, so when old books are to be thrown away by the library, she gets to bring them home and we try to give them new life!
Just take a look at my sister’s other book page projects!


She is crazy talented. If you’d like to see a tutorial on any of these projects, please let me know and maybe I can talk her into doing one for you.
Let’s get crafting!
Time-About 30 minutes
Supplies Needed:
- Ruler
- Craft Glue
- Scissors
- Fishing Line
- 8 Book Pages
- 2 Pieces of Scrapbook Paper (I chose a gold glitter and a red buffalo check for some contrast)
- Micro-hole Punch
- 8 buttons -I used 4 that were white and 4 red but I tried to use different sizes and I love how it turned out
The Process:
The first thing I did was to cut the jagged edges of my book pages off to make them nice and straight. The pages were trimmed down to about 4.5 inches wide and 7 Inches long. After that, I stacked all of them up and hole punched each corner. Then I cut the bottom banner part while they were stacked up so each one would be the same. I just eye-balled this part but you could find a template online I’m sure. You can find this micro hole punch at any craft store.

I then used my different colored craft paper from Michael’s and cut out the Christmas trees. I found a tree shape that I like online and used that as a template for the rest of them. Of course it would be much faster for someone who has a Cricut machine.
Once the trees were cut out, I glued them to the pages and laid them flat to dry for about 10 minutes. Make sure you are getting each tree centered on the book page.
When the pages were dry, I glued a button on each tree, and I set these aside to dry and cut my fishing line. The fishing line is great because you can’t really see it. I used 5 feet of it but I knew I would want them to be spaced out a bit on my console table.
After it was done, I put the pages on my string and hung it up! The gold trees really catch the light from our Christmas tree and the red buffalo check looks so festive! This is such a simple project but I really love how it turned out. I plan on keeping it for next year. I’ll store it in a book for safe keeping so it doesn’t get bent up. This would be a great project for other holidays too!
Let me know if you end up making this! I’d love to see your version and what color trees you used! If you don’t have time to make this, then head over to my Instagram because I’ll be giving one away!!

About The Author
Payton
Related Posts

$100 Bathroom Remodel
Oh boy. This is a makeover to top all other makeovers that I’ve done…
May 19, 2020
$100 Closet Remodel
The real slim shady song has been STUCK in my head all day. I have…
April 18, 20203 COMMENTS
Leave A Comment

Marilyn | 8th Dec 18
I love your post!
Marilyn | 8th Dec 18
These are all very clever things to do with old books!
Payton | 10th Dec 18
Thank you!