Refinished Fireplace Cover
Happy Saturday, Everyone!
I hope you had a great week. I’m so excited about today’s post. Normally my DIY posts are about woodworking but this one is a little different.
When we first moved into our house, there wasn’t a cover over our fireplace. It was just open for anyone to climb on in – mainly Teddy (our golden retriever), but I also had little relatives that come over sometimes who might have thought it was a good idea to climb in there.
I knew that eventually we would have a baby (spoiler alert-we did) and that it would need to be covered. I looked everywhere for a more affordable option than what I was finding online or in stores. These things can get really expensive. We had just bought our house so I was looking for something a little more budget friendly – almost free. Hahaha.
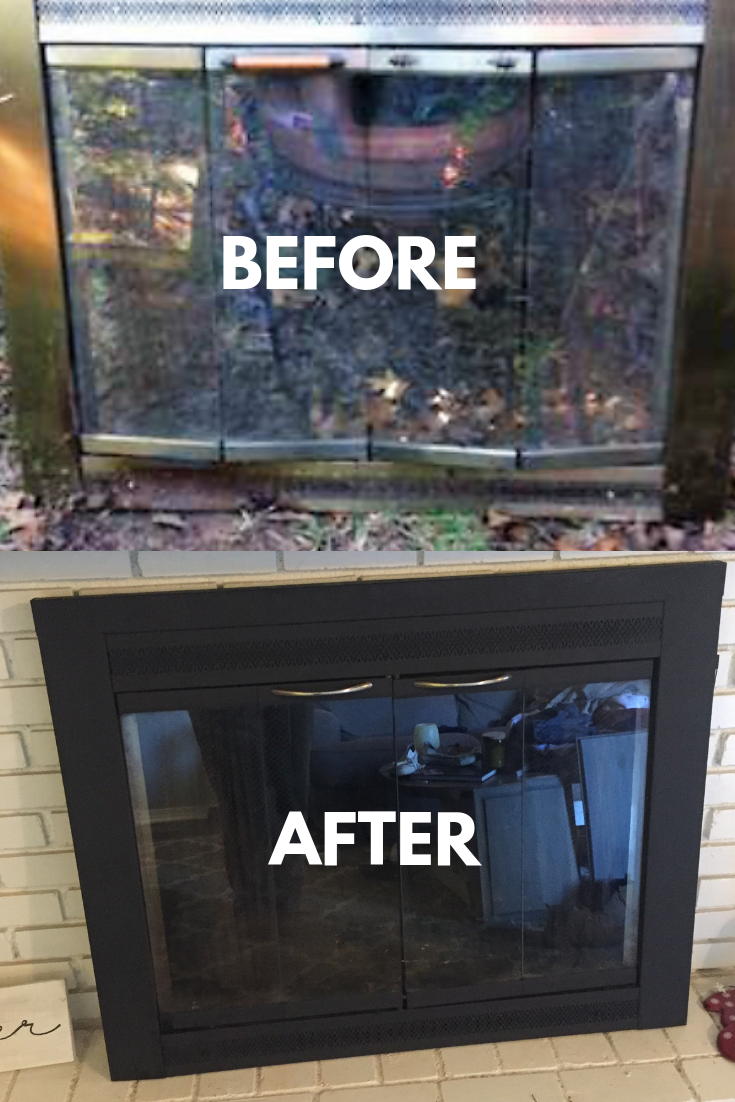
I thought that maybe if I could find one for super cheap that I could make it over and if it looked terrible then it wasn’t that big of an investment. I found a $10 door on craigslist that had definitely seen better days. You can see from the photo of the posting that it needed a lot of work. I called my mom to go with me since Evan was at work because craigslist is scary and we were picking it up at someone’s house. It was really heavy so I’m glad I had help to carry it to the car.

I picked up a can of Rustoleum High Heat matte black spray paint and a couple of new handles for the doors and went home and got right to work. Oh, I should probably mention that I had measured the fireplace opening to see if it would fit first. That’s kind of an important step.
The first thing that I did was clean it. It had a ton of rust and some sharp places so I first cleaned it with soap and water and a wire brush. It was filthy. I cleaned the glass with Windex and it had already made a huge difference. I also cleaned the back side of it but I didn’t scrub and sand it because no one would be seeing it.
Once it was clean – (took about an hour and half, it was a lot of scrubbing) – I decided to sand it a little and try and get the surface as smooth as possible.
As a final step of preparation, I taped off the glass and covered it with cardboard so I could spray paint the frame. I ended up doing a few coats of paint. After the paint dried, I slapped the new hardware on and brought it in the house to hang. I had Evan help me hang it and in about 15 minutes we had a new fireplace cover!

This project got completed just in time to host our Christmas Party that year. The cover is now about 3 years old and still looks great. It was probably decades old when I bought it and now it’ll probably be here for a few more! The paint really took years off of the dated brass. I’m so glad that I decided to tackle this project and step out of my comfort zone to make it happen. It wasn’t difficult, just time consuming, but so, so worth it!
It kind of makes you think about what other treasures might be waiting to be found on craigslist. Always use the buddy system when picking up though.
I hope everyone has a great weekend and if you’re around here, stay warm!
About The Author
Payton
Related Posts

$100 Bathroom Remodel
Oh boy. This is a makeover to top all other makeovers that I’ve done…
May 19, 2020
$100 Closet Remodel
The real slim shady song has been STUCK in my head all day. I have…
April 18, 20202 COMMENTS
Leave A Comment

Matilyn | 21st Jan 19
It still looks great today!
Matilyn | 21st Jan 19
The paint still looks good today!